How to Fix: Send Encrypted Email to Gmail (Postfix, TLS, SSL Certificates)
How to Fix: Send Encrypted Email to Gmail (Postfix, TLS, SSL Certificates)

Submitted by Dennis Faas on Fri, 11/03/2017 - 16:17
Infopackets Reader Martin R. writes:
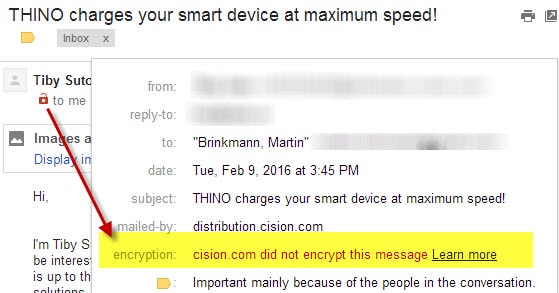
" The email newsletter I receive from you is showing in my gmail as "unencrypted," with a red pad lock. There is also a new warning banner that says: 'Be careful with this message. It contains content that's typically used to steal personal information.' The options are: learn more, report this suspicious message, ignore, or 'I trust this message.' This is not the only email I get that shows as unencrypted. What does this mean and how can it be fixed? "
My response:
Essentially it means that the mail you received (at gmail) was not sent using email encryption. I'll explain more about that below; "fixing it" can only be done by mail server (or server administrator) responsible for delivering the email to you. In other words, it's not really something you have control over unless you are a server administrator.
Note: if you are operating a domain / mail server and are primarily interested in 'how to configure postfix for outgoing email encryption to gmail servers' portion, you can skip ahead, or continue reading below.
What Does it Mean if Gmail Reports my Email isn't Encrypted (Red Pad Lock)?
When you send an email, it is queued for delivery at the mail server. In this case, the Infopackets mail server was responsible for sending you the Infopackets newsletter to your gmail address. When the Infopackets mail server connects with gmail's mail server, it initiates what is called a 'handshaking protocol' to begin the email delivery.
You received the gmail 'red pad lock' on your message because the handshaking protocol was not encrypted using valid security certificates (and using a TLS handshaking protocol). As such, this theoretically could mean that the message could have been intercepted and therefore modified during its transmission. Similar technology is used with Wifi signals - if you don't encrypt the Wifi signal, data is open and therefore susceptible to being "sniffed" and potentially modified while in transit.
To fix this error, the server sending the email must deliver the message using a valid SSL security certificate with TLS handshaking enabled - once again, this would be a server administration task and not something you need to concern yourself with. It's important to note that if you receive an email at gmail with a red pad lock, it doesn't necessarily mean that the message has been compromised - it simply means that the message wasn't sent using encryption.
With that said, email encryption is not really a standard - but it will soon become a standard. I was also notified in yesterday's article (in the comments section) that other users were complaining of the same thing. I did not notice this before because I don't use gmail to read my gmails - I use an email client.
After about 6 hours or so last night I was able to fix the error. Below I'll explain the steps I took to fix it.
How to Fix: Send Encrypted Email to Gmail (Postfix, TLS, SSL Certificates)
When I first researched the "red padlock" issue using gmail, the gmail website itself told me I needed S/MIME (Secure/Multipurpose Internet Mail Extensions) in order to encrypt the emails. Searching google how to configure a mailserver for S/MIME did not come up with much; instead I found out that I could simply modify postfix (my mail transport agent, or MTA) to use TLS encryption on outgoing messages from the mail server.
I already had TLS enabled on incoming connections (from my PC to the mail server), but not outgoing connections. After many hours of research I discovered that in order to enable TLS handshaking on outgoing emails (from my mail server to gmail, yahoo, etc) the - only - settings necessary to modify in the Postfix main.cf configuration file (/etc/postfix/main.cf) are:
smtp_tls_security_level = may
smtp_tls_loglevel = 1
smtp_tls_CAfile = /etc/ssl/certs/cacert.pem
The question is - how do you get the cacert.pem (certificate authority certificate) file to make this happen?
The answer is that you need to either (a) buy an SSL certificate and generate your own cacert.pem (I am not yet sure how to do that), (b) use 'letsencrypt' which produces a free, valid SSL certificates, and generate your own cacert.pem, or (c) generate your own TLS keys and cacert.pem using openSSL.
I tried 'letsencrypt' but the program aborted with errors - apparently the latest revision has bugs which are still being worked on. As such, I chose option (c) since that was the only viable choice at the time.
Important: If you already had TLS enabled encryption on incoming email (from your PC to your mail server) you will have to regenerate your TLS certificates. It is necessary so that you can generate the cacert.pem file (which is used to encrypt the emails to the gmail server).
Here are the steps I went through, based on the tutorial found over at e-rave.nl. My comments are marked with four hash marks (####).
####First make a temporary directory, assuming you are signed on as root user cd /root
mkdir temp
cd /temp
####Next, generate a private key for the server. Use a random password generator to generate a strong password, and put it aside in a notepad file so you can copy and paste the password into the terminal window when prompted. The below command will ask for the randomly generated password.
openssl genrsa -des3 -out mail.domain.tld.key 2048
####Now it's time to create the certificate request. The below command will ask for the randomly generated password; it will also ask you for the "common" name used when creating the certificate - enter your web server domain name in this field. Near the end it will also ask for 'extra attributes' password - do not enter a password here.
openssl req -new -key mail.domain.tld.key -out mail.domain.tld.csr
####Now it's time to create the self-signed key. It will also ask for the randomly generated password.
openssl x509 -req -days 365 -in mail.domain.tld.csr -signkey mail.domain.tld.key -out mail.domain.tld.crt
####Now we need to remove the password from the private certificate so that there is no need to enter in a password when you restart postfix. You will need to enter in the randomly generated password.
openssl rsa -in mail.domain.tld.key -out mail.domain.tld.key.nopass
####The command below will overwrite the old key with the new key (without password).
mv mail.domain.tld.key.nopass mail.domain.tld.key
####Now it's time to make yourself the "trusted certificate authority". This is the file used on outgoing TLS handshakes (to gmail, etc) to encrypt the emails. The below command will create a cacert.pem file that is good for 10 years. You will need to enter in the randomly generated password. When it asks for your the 'common' name, enter in your web domain name.
openssl req -new -x509 -extensions v3_ca -keyout cakey.pem -out cacert.pem -days 3650
####Make directories for the certificates and give proper chmod permissions.
mkdir -p /etc/ssl/private/
mkdir -p /etc/ssl/certs/
chmod 600 mail.domain.tld.key
chmod 600 cakey.pem
cp mail.domain.tld.key /etc/ssl/private/
cp mail.domain.tld.crt /etc/ssl/certs/
cp cakey.pem /etc/ssl/private/
cp cacert.pem /etc/ssl/certs/
####edit your /etc/postfix/main.cf file to include the following if it is not there already:
nano -w /etc/postfix/main.cf
smtpd_use_tls = yes
smtpd_tls_auth_only = no
smtpd_tls_key_file = /etc/ssl/private/mail.domain.tld.key
smtpd_tls_cert_file = /etc/ssl/certs/mail.domain.tld.crt
tls_random_source = dev:/dev/urandom
####myhostname - DOMAIN NAME MUST MATCH YOUR CERTIFICATE'S "COMMON" NAME!
myhostname = yourDomainName.com
####save main.cf, then restart postfix
service postfix restart
Test Outgoing Emails from Your PC to the Mail Server
At this point I suggest you send an email to your mail server while monitoring the mail log for errors ('tail -f /var/log/maillog'). If you already had TLS enabled in the email client for your SMTP server (to encrypt emails sent from your PC, for example), you may need to re-accept the certificates in your email client on the PC.
If it works without any issues, it's time to enable TLS handshaking for outgoing emails from your mail server to another server. This should finally encrypt your outgoing mails and get rid of the red pad lock commonly seen in the gmail interface for emails that aren't encrypted. Since the mail certificates were self signed, the pad lock won't turn green, but will simply not show.
####The below commands will copy your cacert.pem file to /usr/share/pki/ca-trust-source/anchors/, where you it can be adopted it as server-wide authority trust. This will prevent "verify return code: 19 (self signed certificate in certificate chain)" error messages. I am not 100% sure if this is necessary but I came across this while researching the issue and thought it wouldn't hurt.
cd /etc/ssl/certs/
cp cacert.pem /usr/share/pki/ca-trust-source/anchors/
update-ca-trust
####Assign postfix permissions to the cacert.pem file. Cacert.pem = certificate authority (public, not private).
chown postfix:postfix cacert.pem
####Finally, modify postfix so that outgoing emails are TLS enabled so that emails are encrypted.
nano -w /etc/postfix/main.cf
smtp_tls_security_level = may
smtp_tls_loglevel = 1
smtp_tls_CAfile = /etc/ssl/certs/cacert.pem
That's it - try sending an email using your PC to a gmail email address to see if the red padlock has disappeared. Alternatively you can fire off an email directly from the mail server by using the following command:
mail -s "Test Subject" user@example.com < /dev/null
I hope this saves someone hours of frustration trying to do the same (and clarifies some things I just couldn't find the answer to)!
Got a Computer Question or Problem? Ask Dennis!
I need more computer questions. If you have a computer question -- or even a computer problem that needs fixing -- please email me with your question so that I can write more articles like this one. I can't promise I'll respond to all the messages I receive (depending on the volume), but I'll do my best.
About the author: Dennis Faas is the owner and operator of Infopackets.com. With over 30 years of computing experience, Dennis' areas of expertise are a broad range and include PC hardware, Microsoft Windows, Linux, network administration, and virtualization. Dennis holds a Bachelors degree in Computer Science (1999) and has authored 6 books on the topics of MS Windows and PC Security. If you like the advice you received on this page, please up-vote / Like this page and share it with friends. For technical support inquiries, Dennis can be reached via Live chat online this site using the Zopim Chat service (currently located at the bottom left of the screen); optionally, you can contact Dennis through the website contact form.
Rate this article:
Category:
Need Help? Ask!

My name is Dennis Faas and I am a senior systems administrator and IT technical analyst specializing in cyber crimes (sextortion / blackmail / tech support scams) with over 30 years experience; I also run this website! If you need technical assistance , I can help. Click here to email me now; optionally, you can review my resume here. You can also read how I can fix your computer over the Internet (also includes user reviews).
My name is Dennis Faas and I am a senior systems administrator and IT technical analyst specializing in cyber crimes (sextortion / blackmail / tech support scams) with over 30 years experience; I also run this website! If you need technical assistance , I can help. Click here to email me now; optionally, you can review my resume here. You can also read how I can fix your computer over the Internet (also includes user reviews).
We are BBB Accredited

We are BBB accredited (A+ rating), celebrating 21 years of excellence! Click to view our rating on the BBB.
Comments
Debian/Ubuntu
This guide worked great for solving the issue of the "red lock" icon and "not using encryption" warning that google shows when sending email from postfix. There was only one hiccup. I'm running Debian 9 and there is no directory "/usr/share/pki/ca-trust-source/anchors/" for the command "cp cacert.pem /usr/share/pki/ca-trust-source/anchors/".
For the two commands listed below, I instead followed this guide:
https://blog.confirm.ch/adding-a-new-trusted-certificate-authority/ (original)
https://web.archive.org/web/20190703204916/https://blog.confirm.ch/adding-a-new-trusted-certificate-authority/ (archived)
Instead of :
"""
cp cacert.pem /usr/share/pki/ca-trust-source/anchors/
update-ca-trust
"""
I used:
"""
Debian / Ubuntu
To trust a certificate authority on a Debian or Ubuntu system, you’ve to save your custom certificate authority file(s) to the directory /usr/local/share/ca-certificates. After that, run the binary /usr/sbin/update-ca-certificates to update the trusted certificate authority file of the OS.
"""
Also, there are a few lines that are not present in the main.cf file, so I simply added them with the rest of the "TLS parameters", and followed the rest of the guide verbatim.
Thanks so much for the great guide!