How to Fix: Seagate NAS Reset Admin Password
How to Fix: Seagate NAS Reset Admin Password

Submitted by Dennis Faas on Fri, 10/25/2019 - 15:28
Infopackets Reader Steve T. writes:
" Dear Dennis,
I own a Seagate 4 Bay NAS (network attached storage) and I forgot my admin password. The admin user allows me to create and delete network shares, plus a lot of other options - which, as I recall, are currently missing from the NAS control panel. I've tried resetting my password from the NAS web control panel, which then takes me to the Seagate website, but this hasn't restored full admin access to my account. I don't know what to do! I need access to this part of the control panel so I can make some configuration changes. Can you help? "
My response:
I asked Steve if he'd like me to connect to his PC using my remote desktop support service in order to have a closer look, and he agreed.
Below I will discuss my findings.
How to Fix: Seagate NAS Reset Admin Password
After investigating the situation, it appears that Steve was attempting to reset the password on his user account which did not have full administrative rights. Therefore the Seagate NAS Pro control panel (viewable through the web browser) was not producing the menus that normally the admin user would see. He spent quite a bit of time trying to guess the admin password to no avail.
After reading the Seagate NAS Pro manual online, it seems that the only way around this is to backup all data on the NAS, then issue a reset on the unit using a paperclip. According to the manual, a reset may or may not retain data, therefore a backup is highly recommended before proceeding.
Here are the steps I took:
- Backup all data on the NAS to a local drive external or internally attached to a PC. Since data will be transferred through the network (which can be considerably slower than a local file copy), it is recommended that you delete all unnecessary files on the NAS prior to the backup in order to free up space
on the unit, and save time backing up the data.
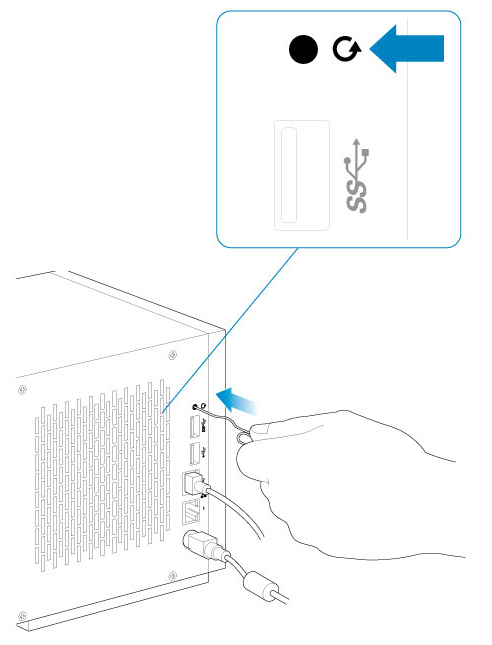
- To reset the NAS: power off the NAS by tapping the power button; this
will take a few minutes to complete. Next, look for a recessed hole (I.E.:
the reset button) on the back of the unit - it should have an arrow in the
form of a circle next to it.
Insert the paperclip into the hole as seen in this picture. While pressing on the reset button, press the power button. Keep both buttons pressed for 5 seconds. This
should reset the unit.
- Power on the unit and wait for it to boot up. Next, go to
http://discover.seagate.com and click on "Find" to find the IP address of your NAS.
- Login to the NAS with the link provided. If you reset the unit properly,
it should now ask you for the MAC (network) address which is written on the back of the unit. It will look something like aa:bb:cc:dd:ee:ff (containing letters and numbers). After that,
login as admin user with name: "admin", and with password "admin".
Note: if it's not asking for the MAC address or if the device doesn't boot at all, please start at Step #2 again. If the NAS still doesn't boot or if you can't access the NAS web control panel, you can try downloading the NAS OS onto USB using a computer, then write the files to USB as discussed here (note: this page says it's for the 4-bay NAS, but may work on the 2 or 6 bay NAS as well). Here is a link to the other NAS OS installers in case it gets updated. Once the NAS USB key is configured, insert it into the NAS and it should boot from USB and reconfigured NAS OS on the unit. If that -still- doesn't fix it, you will need to contact Seagate. If you are not sure how to proceed you can contact me directly for additional support.
- Assuming you were able to enter in your MAC address: on the next page, choose to "Restore to factory settings and keep data", then click "Next". Agree to the terms and conditions and click "Next".
- The Seagate NAS OS will reset to factory settings. This process may take a few minutes to complete.
- When prompted, click the button on the page to restart the NAS. It may take a few minutes to reboot the unit. At this point, the unit will check for and may download a new firmware. If it does an update, it could take up to 10 minutes to complete.
- After reboot, you may need to login again. On the next page, it will ask how you want to access the device. Choose either "Local and Remote (default)", or "Local only". The latter will only allow local network access to the device, while the former allows
you to access the NAS away from home. Technically speaking, there is more involved in allowing remote access (such as port forwarding configuration on the router, including setting up a dynamically assigned IP address). Note that
if you need help setting up remote access to the NAS, I can assist -
contact me here.
- On the next page it will ask for your Seagate Access account. This is used for password resets, or accessing the device remotely through Seagate's web portal. If you don't know your Seagate Access account, you will need to create a new one and also confirm that email address.
- The system will now recreate network shares, providing they are
recoverable from your previous configuration.
- At this point you may need to login again. Use your Seagate Access
account user name (not email address) to log back into to the device.
- You should now have full access to the administration control panel with
full admin access.
- At this point you should be able to access your data stored on the NAS
prior to the reset.
If the data is not recoverable, or if you decide to set up the NAS differently (for example: using SimplyRAID for redundancy instead of JBOD / just a bunch of disks), now is the time to do it. Redundancy means that if one of your disks fails, you can simply replace the disk and not lose data - though this comes at a cost of losing space on the disks, which is used for redundancy. This all depends on your disk configuration. In the case of JBOD, if your one of your disks fail, you lose the data on that disk.
If you decide to change the drive from JBOD to SimplyRAID (for example), you will need to delete existing volumes and then recreate them, then re-upload your data to the NAS. Depending on the amount of data backed up, it could take anywhere from a few hours to a few days to complete.
If you are not sure how to set up RAID, you can contact me for additional support, described next.
I hope that helps.
Additional 1-on-1 Support: From Dennis
If all of this is over your head, and you need help backing up / recovering / resetting / reconfiguring / making the drives redundant / accessing your NAS data remotely, I can help using my remote desktop support service. Simply contact me, briefly describing the issue, and I will get back to you as soon as possible.
Got a Computer Question or Problem? Ask Dennis!
I need more questions. If you have a computer question - or even a computer problem that needs fixing - please email me with your question so that I can write more articles like this one. I can't promise I'll respond to all the messages I receive (depending on the volume), but I'll do my best.
About the author: Dennis Faas is the owner and operator of Infopackets.com. With over 30 years of computing experience, Dennis' areas of expertise are a broad range and include PC hardware, Microsoft Windows, Linux, network administration, and virtualization. Dennis holds a Bachelors degree in Computer Science (1999) and has authored 6 books on the topics of MS Windows and PC Security. If you like the advice you received on this page, please up-vote / Like this page and share it with friends. For technical support inquiries, Dennis can be reached via Live chat online this site using the Zopim Chat (currently located at the bottom left of the screen); optionally, you can contact Dennis through the website contact form.
Rate this article:
Category:
Need Help? Ask!

My name is Dennis Faas and I am a senior systems administrator and IT technical analyst specializing in cyber crimes (sextortion / blackmail / tech support scams) with over 30 years experience; I also run this website! If you need technical assistance , I can help. Click here to email me now; optionally, you can review my resume here. You can also read how I can fix your computer over the Internet (also includes user reviews).
My name is Dennis Faas and I am a senior systems administrator and IT technical analyst specializing in cyber crimes (sextortion / blackmail / tech support scams) with over 30 years experience; I also run this website! If you need technical assistance , I can help. Click here to email me now; optionally, you can review my resume here. You can also read how I can fix your computer over the Internet (also includes user reviews).
We are BBB Accredited

We are BBB accredited (A+ rating), celebrating 21 years of excellence! Click to view our rating on the BBB.